FastSatfinder Help Guide
Minimum System Requirements
- Satellite Dish & LNB
- PC Card: DVB-S/S2
- Processor CPU: 1 gigahertz (GHz) or faster
- Memory RAM: 256 MB or more
- Graphics card: with 32 MB of memory or more
- OS: Windows 10 / Windows 8.1 / Windows 8 / Windows 7 / Vista / XP
Supported Devices
- Acorp TV878DS/DS110/DS120
- ADS Tech Instant TV DVB-S (Part Number: PTV 341)
- Aver DVB-S
- Compro VideoMate DVB-S
- DVBWorld USB2.0 DVB-S/DVBWorldDTV(PCI-Sat)
- FireDTV, Floppy DTV
- GeniaTech DigiStar DVB-S/S2 cards
- Hauppauge Nova SE2/HD-S2/HVR3000/HVR4000…
- Kworld DVB-S 100 compatible (Vstream, Dynavision…)
- LifeView FlyDVB DVB-S/Trio/…
- Netcast DVB
- Nexus, Premium (SkyStar1 driver 2.x from TechnoTrend)
- Pinnacle PCTV Sat/Pro/Dual…
- Technisat SkyStar 2, SkyStar HD, SkyStar USB 2.0, SkyStar USB Plus(use TT-Connect 2400)
- TechnoTrend TT1200/1401/2400/3200/3600/3650
- TwinHan 1034/1041/… and compatible (VisionDTV, Power Color, Chaintech, …)
- Other DVB-S/S2 Cards with BDA driver (With some cards problems are possible)
Installation
- First, download the latest version of the FastSatfinder installation file and save this file on your computer's hard drive anywhere.
- Then double-click on the downloaded setup.exe file to start the installation.
- Follow the instructions on the screen to complete the installation.
Configuration
To run FastSatfinder: Go to the Start menu, then All programs and select FastSatfinder. Open FastSatfinder (right-click) or double-click on the FastSatfinder icon on your desktop. FastSatfinder will immediately be started after the program’s initialization and is ready to receive a signal from a chosen satellite. You should first verify that all parameters are preset correctly before you can start adjusting your antenna.
Select Device
When you run FastSatfinder for the first time, you must select your installed device from the devices list in your FastSatfinder sofware. Click on the "Device" button and the devices list window will appear.
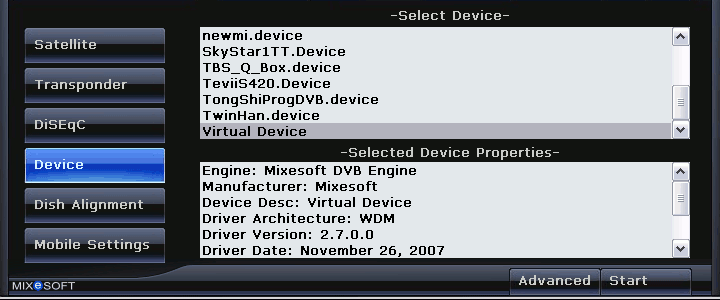
Select the type of card you have installed in your computer to work with FastSatfinder and click on the "Start" button.
Set DiSEqC
Click on the "DiSEqC" button to configure the DiSEqC switch parameters.
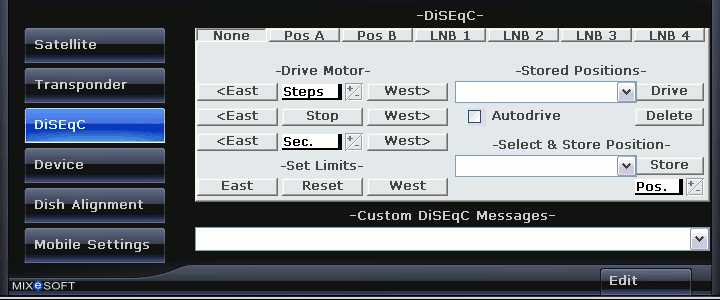
In DiSEqC list, there are seven options: None, Simple A, Simple B, LNB1, LNB2, LNB3 and LNB4. If you only have one dish and LNB without a motor installed, you may choose None. If you are using DiSEqC Multiswitch you possibly have to change the presets to your own personal needs.
Select satellite
Click on the "Satellite" button. The Satellite list box appears. Select the satellite you want to search for.
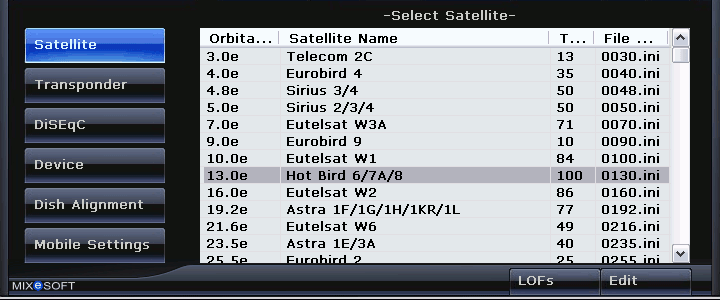
The selected satellite and other parameters are pre-selected each time by default when you load the program. You can also sort the information by clicking the tabs.
Select transponder
Every satellite has many transponders and you must select the transponder for the satellite where your dish is now directed to. Click on the "Transponder" button and select the transponder in the Transponder list you want to check.
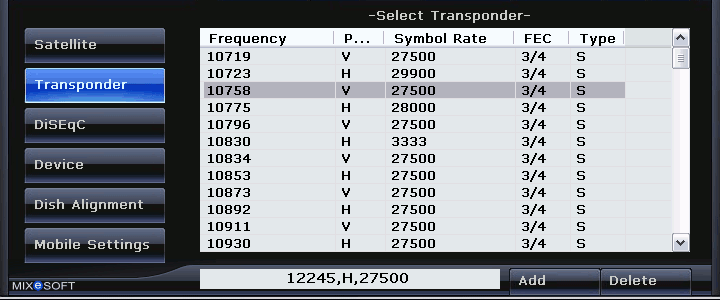
To obtain the best possible results, it is recommended that FastSatfinder users should download the most recent transponder files. You can download them here.
You can manually add a transponder to the list, but you will need to know the frequency, symbol rate, and polarity of the transponder that you want to add. To add a transponder, enter the parameters of the transponder and click on the "Add" button under the Transponder list. Use the following format: 12245,V,27500 or 12245000,V,27500000. To delete a transponder that you are no longer using, highlight the transponder and click "Delete" under the Transponder list.
Control panel
The Control Panel provides information about the current configuration and shows indicators of the signal that displays the current values of quality and level.
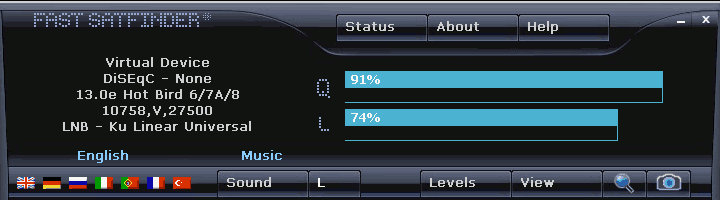
On the Control Panel you will also find several buttons which can be used to control the sound parameters. There are seven sound modes that you can select by clicking the "Sound" button:
- Auto - if and when a signal is found, it will three times give a tone signal and then will tell you the values of that signal
- Tone - if and when a signal is found, it will give a tone signal
- Voice - if and when a signal is found, FastSatfinder will tell you the values of that signal
- Mute - sound is disabled
- Bird - if and when a signal is found, it will play singing the birds sounds
- Alarm - if no signal is found - alarm
- Music - if no signal is found, play the music
FastSatfinder can report the values of a signal in nine different languages: English, French, German, Italian, Polish, Portuguese, Russian, Chinese or Turkish simply by clicking on the flags from the country where each language is spoken.
Click on the "L/Q" button and the FastSatfinder program reports the level/quality of signal.
Double-click on the control panel to view the graph of signal in full-screen mode.
Advanced Modules
Satellite dish alignment module
To determine the proper dish angles and to direct the antenna at the desired satellite Click on the "Dish Alignment" button. Now, the Dish Alignment window appears.
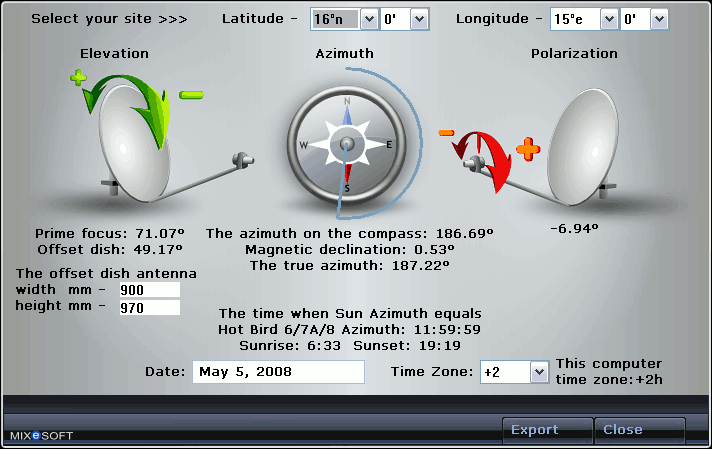
This module calculates the angular difference between a magnetic bearing and a compass bearing, the LNB polarization tilt angle, the azimuth and elevation angle based on your city's latitude, longitude and current satellite position.
To determine your latitude and longitude please use one of the following:
- Use GPS (Global Positioning System)
- Use our site Latitude Longitude Lookup service, that can supply you with the locations of most of the major cities in the world
- Use Google Earth, the 3D geography browser from Google
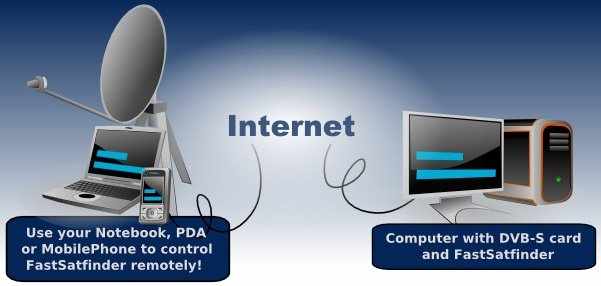
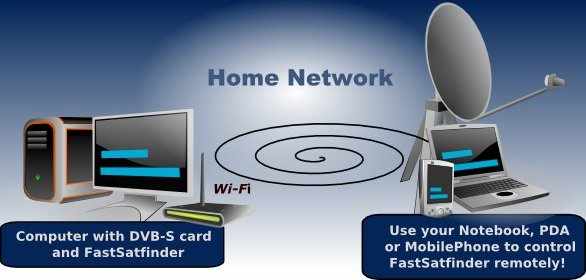
Working remotely with FastSatfinder
This module can be used to check the quality and/or the level of a signal on a Mobile Phone or another computer anywhere in the world.
No additional software needs to be installed on the remote device (platform independent). There are two ways to begin working remotely.
Method A
If you want see the quality and/or the level of a signal on a Mobile Phone or on another computer anywhere in the world.
Before you begin, ensure that the computer which has FastSatfinder running has its own external (internet) IP address and if you use firewall software on this computer you should preset your firewall to open port 80 (HTTP).
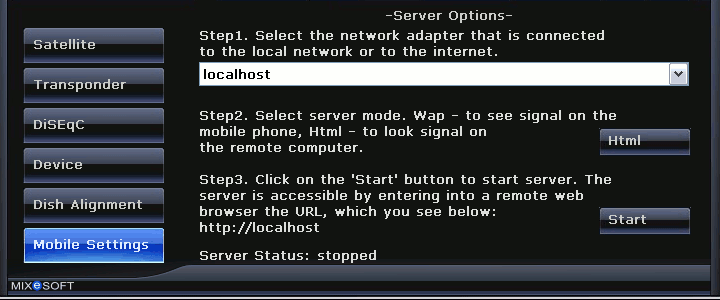
- Click on the "Mobile" button to open the FastSatfinder Server panel.
- Ensure that computer on which you have FastSatfinder running and your Mobile Phone (a cell phone with active GPRS, EDGE, 3G, 4G, or 5G service) has an active internet connection.
- Click on the "GetIP" button to get the external IP address of the computer on which you have FastSatfinder runnnig.
- If you're behind a router, you will need to login to the router and set the port number 80 (HTTP) to be forwarded to the IP address of the computer where you have installed FastSatfinder. If, for example, you set the port number 80 (HTTP) to be forwarded to IP Address 192.168.1.2, then all HTTP requests from internet will be forwarded to 192.168.1.2.
- Click on the "Start" button to start the FastSatfinder server.
- On your Mobile Phone start the mobile device browser or, if you are on your Remote Computer, launch Microsoft Edge or another internet browser, e.g. Google Chrome.
- In the Address box, type the URL. The URL is "http://address" where the address is the external IP address of your computer on which you have FastSatfinder running.
- Now you are able to see the webpage generated by FastSatfinder. This page is automatically reloaded every second by default. You can change this parameter by opening the fastsatfinder.ini file in a text editor like Notepad and change the value of key "refresh"
Method B
If you want see the quality and/or the level of a signal on another computer on your local network.
If you use firewall software on computer with running FastSatfinder set your firewall to open port 80(HTTP).
- Click on the "Mobile" button to open the FastSatfinder Server panel.
- Ensure that computer with running FastSatfinder and your Remote Computer has an active local network connection. Click on the "Start" button to start FastSatfinder server.
- Click on the "GetIP" button to get the external IP address of the computer on which you have FastSatfinder runnnig.
- On your Remote Computer, launch Microsoft Edge or another internet browser, e.g. Google Chrome.
- In the Address box, type the URL. The URL is "http://address" where the address is the local IP address of your computer on which you have FastSatfinder running.
- Now you are able to see the webpage generated by FastSatfinder. This page is automatically reloaded every second by default. You can change this parameter by opening the fastsatfinder.ini file in a text editor like Notepad and change the value of key "refresh"